About
This website is intended to serve as a learning resource for junior radiology residents preparing to take call for the first time, although anyone wishing to practice interpreting cross-sectional neuroradiology images will benefit from the site. All the cases presented here are those that can be encountered in an ED or oncall setting and are shown in a PACS-like web viewer. I cannot guarantee that every fact mentioned on this website is accurate or that I discuss every finding in every case. Should you notice an inaccuracy or a finding not described in the discussion for the case, please leave a comment on that page so that I may edit the page as needed. The development of this website has IRB approval from my local institution.
The webviewer requires a modern browser but no additional addons or plugins. I have tested it on the latest version of desktop Chrome and Edge as well as Chrome for android but I don’t expect it to work on older or all browsers (in particular Internet Explorer will not work. I do not have any Apple products so can’t test Safari. Firefox is noticeably slower than Chrome or Edge but otherwise works).
Here is a basic overview of the viewer:
A few things to note:
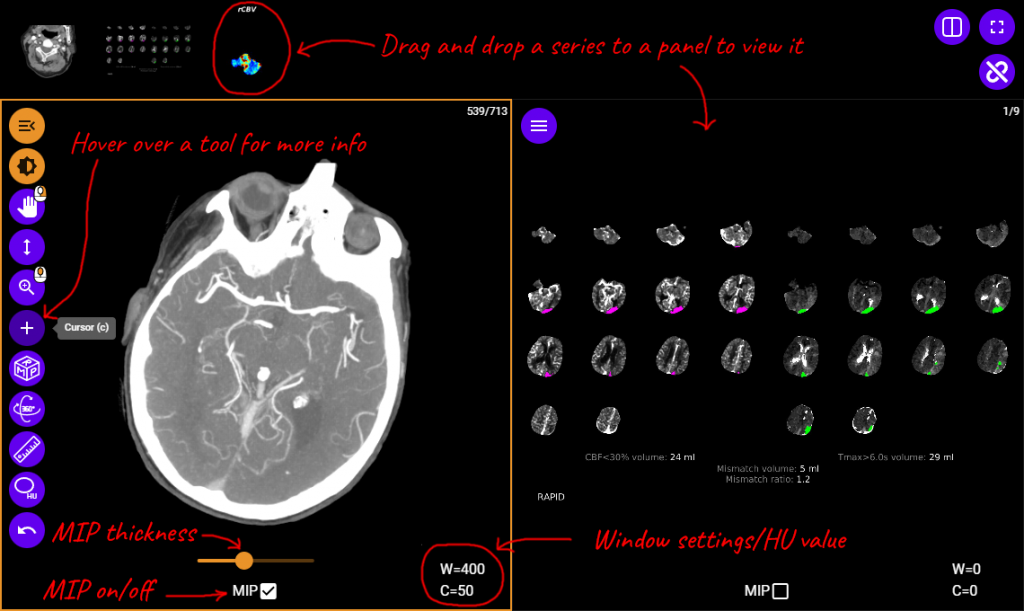
- Use drag and drop to display an image series on a given panel. On mobile, you have to touch and hold the image series icon you want for at least 0.4 seconds and then start dragging.
- Hovering over a tool with your mouse will show what the tool does as well as its keyboard shortcut (i.e. the keyboard shortcut for cursor is “c”).
- The active panel is the one with an orange border around it. Pressing a keyboard shortcut will change the current tool for all panels, except for the reset and MPR tool which only apply to the active panel.
- Different mouse buttons can be assigned to different tools. The tool assigned to left button/touch is shown in orange. The tool assigned to the other buttons are indicated by the mouse icon with the corresponding button in orange (here, left button is assigned to window, right button is assigned to pan, and wheel/middle button is assigned to zoom). To change, simply click the tool you want with the desired button and they will become associated.
- To use a tool, hold down the corresponding mouse button and move the mouse.
- When you click the window tool, a menu opens with some preset window levels. If you don’t want one of the preset window levels, just use your mouse to manually set the window center and width. As you adjust, the window width and center are shown in the bottom right corner. The window level can be reset to default using the reset tool, although the scale and center of the image will also be reset.
- The cursor tool does two things: when you click on a point in one panel, it shows the matching point in the other panels. In addition, the image value at the clicked point is also shown on the bottom of the panel (this would be the attenuation coefficient in HU for all CT images)
- The MPR tool can be very useful for the thin-section CTA and head CT images! It toggles between axial, sagittal, and coronal reformations. You can drag/drop the same series to both panels, MPR one to the orientation you like, and then use the cursor tool to see the same point on different orientations.
- The MIP tool obviously would be very useful for thin-section CTAs. When you click it on, a slider appears allowing you to change the MIP thickness. The default is 2 cm.
- The Rotate axis/3D MPR tool pivots the axis around the cursor position allowing you to get arbitrary 3D MPR images (which can then give you 3D MIPs). It takes a while to get used to but is very powerful once you get the hang of it.
The main anatomy module consists of a high resolution brain MRI and head CTA (bone recons) performed on the same subject, linked together, and annotated. Keep in mind that all osseous and foraminal annotations were performed on the CT and then projected to the MRI so the small structures might look a bit off on the MRI (the Vidian canals for instance are about 1 slice off on the MRI).
The cortical brain anatomy segmentation is based heavily on the automatically generated segmentation using FreeSurfer. I have expanded the cortical annotations so that they are easier to point to with the mouse and manually edited some of the segments to better respect obvious sutural anatomy and look smoother.